Welcome to part 2 of our Exchange migration series. In part 1 we went over our initial testing and getting our on-premises servers prepared for the hybrid connection to Exchange Online. In Part 2 we are going to cover running through the installation process of the Hybrid Connection, and the bug squashing we had to go through to get it running perfectly.
So, without any further delays let’s get into it!
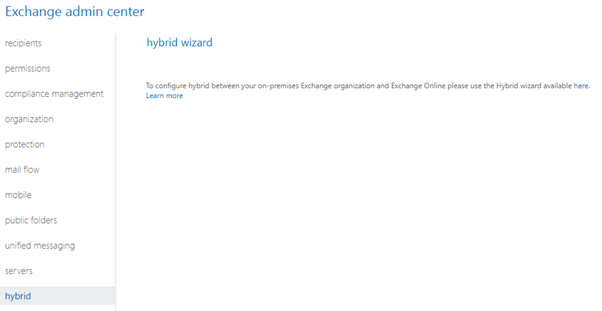
Hybrid Connector Wizard
The Hybrid Connector Wizard is launched from within the Exchange 2016 web UI
Clicking the little blue “here” will download and launch the connection wizard that will take you through the rest of the configuration. You would have thought that this would be made a little bigger, or at least more obvious, but apparently that is all we need.
For the most part our configuration went without any real issues. Our Connections to Exchange, and Office 365 passed, and we opted to run a “Full Hybrid Configuration”. Our only issue came when we went to add our hybrid domain.
When going to add a domain you are asked to add a TXT record to verify you are the owner. After this process was completed, the wizard would stall at “adding federated domain”.
There where a few options to try and navigate this error:
Bypass the check by creating an .ini file and placing it in the exchange server config folder: C:\Program Files\Microsoft\Exchange Server\V15\Config
Unfortunately, this work around didn’t work for us surprising no one.
Looking at the logs further we can see that this check is just that, a check. If we could work out a way to just move past it and continue on with the wizard it would be fine as we know we have completed the right steps.
2. Option 2 is what some would call genius, and others would call desperation.
Starting the wizard over again and this time running it as the original Exchange 2010 server we reran the same process. Once it got to the same stage the domain was verified instantly!
We closed the wizard, and then exported the federation certificates, and loaded them into the 2016 server overwriting the current federation certificates. Ran the wizard again as the 2016 Server and huzza! the domain verified and we can push onward!
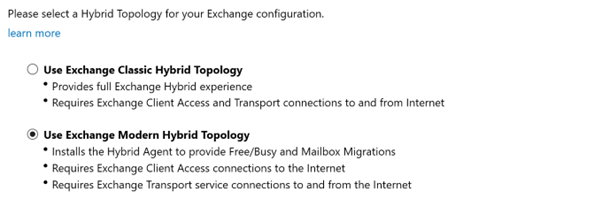
For the next step we chose to go with Modern Hybrid Topology as we want the nice Free/Busy calendar notifications for our client, as they may not all be in Exchange Online in a short period of time, and some legacy mailboxes may remain on premise as other services are depreciated.
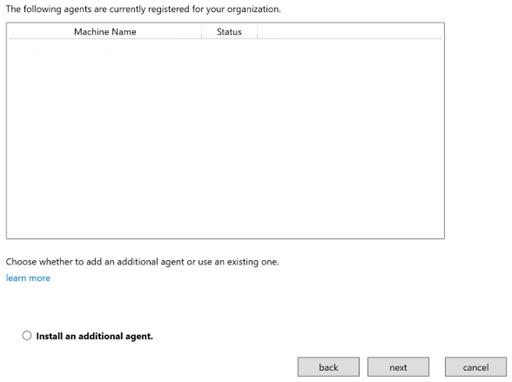
We want to install a new agent on the 2016 server as shown below:
Our client doesn’t have Edge transport servers so we opted for the typical configuration, which was to set the receive connector as the 2016 server, and the send connector as the same.
The transport certificate must be a third party issued certificate. We exported the certificate currently being used by the 2010 server and installed it with the required roles on the 2016 server.
Finally, we entered our Fully qualified domain name, and finalised our installation.
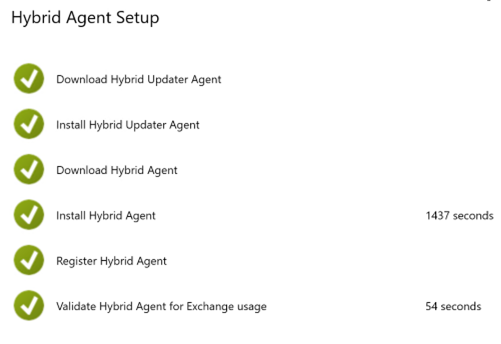
And there you have it! After a short install we have green ticks across the board. The only thing left to do now is migrate over our first test user.
Migrating over a user is done within the Exchange admin centre > Migrate and now that the connector is configured it’s just a matter of following the bouncing ball. We migrated a test user over without any problems, then handed back over to the local I.T. team with the relevant training to complete the rest of the migration batches.
Thank you for coming along on this journey and if this sounds like a situation you find yourself in or you are staring down the barrel of an Exchange 2010 or 2013 migration to Exchange Online please feel free to reach out and Garage of Awesome Consulting can assist you through the process.